eps1.3AI
Context Engineering - Part 3: Spec-Driven Development
Instead of one giant prompt and hoping for the best, markdown specs become the source of truth: PRD, Tech Spec, tasks, review and QA, step by step with Claude Code.
You open your AI agent and type: “build a website for my company, nice and responsive”. It builds one. At first glance the result even looks good, but it doesn’t have your menu, doesn’t speak to your audience, uses a stack nobody on the team knows and has not a single test.
The problem isn’t the model. It’s the context. In part 1 we saw that the LLM only works with what’s in the context window, and in part 2 we saw how Rules and Skills give the agent memory and abilities. What’s missing is organizing what it will build, how and in what order. That’s what Spec-Driven Development solves.
This post is based on a talk I gave to my team, where we built a landing page from scratch with this workflow. All the material is in the repository github.com/renangabriel27/spec-driven-development: commands, templates, rules, the generated documents (in Portuguese) and the site itself, which is live at fretadao-site.vercel.app.
What Spec-Driven Development is
Spec-Driven Development (SDD) means working with documents as the source of truth instead of loose prompts. Before writing code, the agent helps you write:
- PRD (Product Requirements Document): the what and the why. Problem, goals, user stories, numbered functional requirements and, very importantly, what’s out of scope.
- Tech Spec: the how. Architecture, components, interfaces, stack decisions, testing strategy and development sequence.
- Tasks: the PRD and Tech Spec broken into small tasks, each with subtasks, success criteria and its own tests.
These files live in markdown inside the repository, and here’s the trick: they become the memory of the work. Which task is done, which test is missing, what was decided and why. You close the session, open another one the next day and the agent picks up where it left off, without you explaining anything again.
Instead of sending a giant prompt every time, you work on top of specs that were discussed, reviewed and approved.
Tools that already do this
There are ready-made tools for this workflow:
- GitHub Spec Kit: GitHub’s open source kit with a CLI, templates and prompts to go from spec to technical plan to tasks.
- Kiro: AWS’s IDE that turns a prompt into requirements, a design document and a task list before generating code.
- Compozy: an open source project made by Brazilians that orchestrates several agents (Claude Code, Codex, Gemini CLI, Cursor) in a pipeline with shared memory. Worth opening the repo just to study how its skills are organized.
They’re great, but they hide the steps. In this post we’ll run the workflow by hand, with one command per phase, to understand what happens under the hood. After that, any of these tools gets much easier to understand.
Commands: the prompt you don’t have to rewrite
In part 2 we talked about Rules and Skills. This post’s workflow uses a third Claude Code feature: commands.
A command is a prompt you’d always write the same way, saved in a file under .claude/commands/. Instead of pasting the same 80 lines of instructions every time, you type /create-prd and you’re done.
The difference from a Skill is who triggers it. A Skill leaves its name and description in the context window, and the agent decides when to load it. A command takes up nothing in the context until you call it, and only you call it. For a step-by-step workflow, where you want to control exactly when each phase starts, that’s an advantage. (These commands could be Skills too; I used commands to introduce the concept.)
The repository has one command per step:
.claude/
  commands/
    create-prd.md
    create-techspec.md
    create-tasks.md
    run-task.md
    run-review.md
    run-qa.md
    run-bugfix.md
  agents/
    task-reviewer.md
  rules/
    common/       ← testing, frontend, git, security, debug
    typescript/
templates/
  prd-template.md
  techspec-template.md
  tasks-template.md
  task-template.md
tasks/
  prd-site-fretadao/           ← everything the workflow generates goes here
The challenge: a landing page from a design
The challenge in the talk was building Fretadão’s corporate website, a single page, from a finished design. (It’s not the company’s official website: it’s teaching material, and the content only illustrates the process.)
First tip, and maybe the most important one for front-end work: start with images. I generated the site mockup in Claude Design and saved the screens in the project’s site/ folder, one image per section. With the design in hand, the agent knows exactly what to build, and the quality difference compared to describing the layout in text is huge.
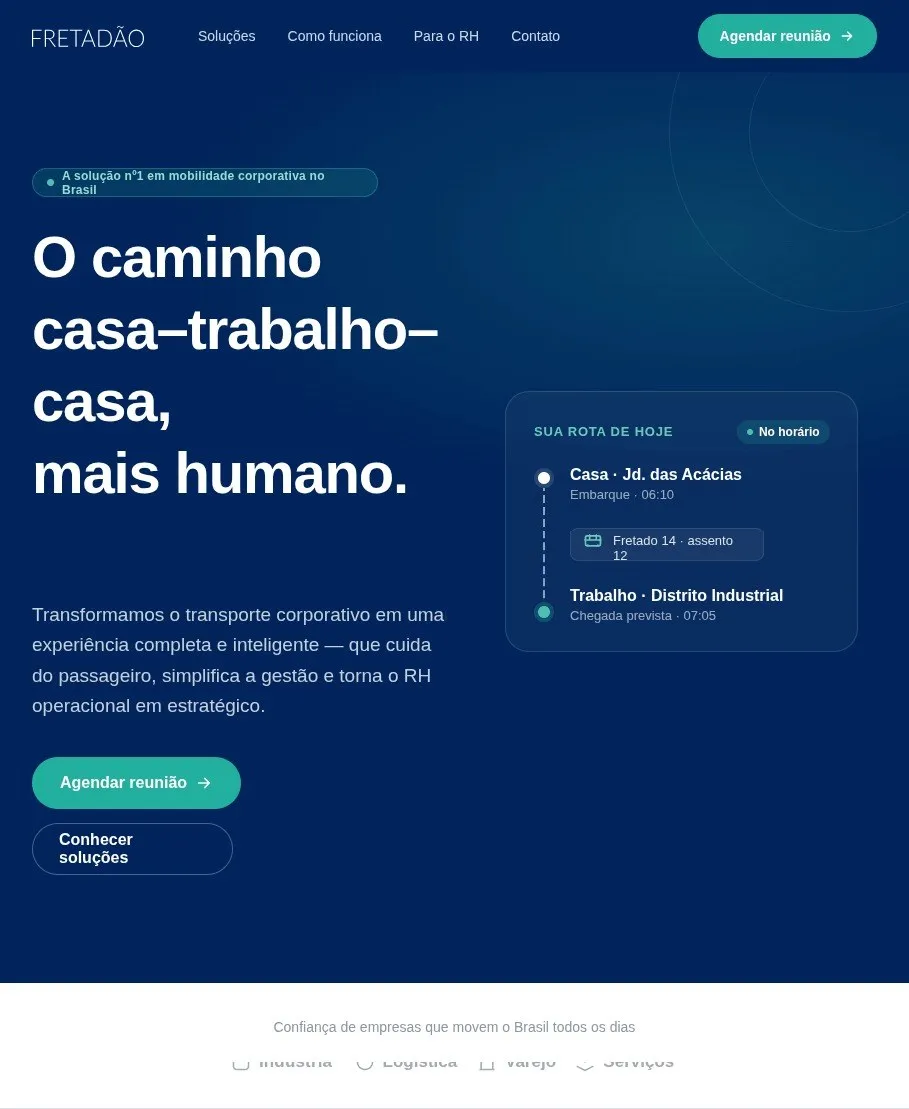
That’s the hero, the first of six images. The others cover the solutions, “how it works”, the manifesto, the final CTA and the footer.
Step 1: the PRD (/create-prd)
The create-prd command has these rules at the top, highlighted:
<critical>DO NOT GENERATE THE PRD BEFORE ASKING CLARIFYING QUESTIONS</critical>
<critical>UNDER NO CIRCUMSTANCES DEVIATE FROM THE PRD TEMPLATE STRUCTURE</critical>
The flow is: clarify, plan and only then write, following templates/prd-template.md. And the focus is on the what and the why, never the how.
I called it like this:
/create-prd I'd like to create a one-page Fretadão website based on the design in the images in @site
Before writing a single line, it analyzed the images and asked me questions:
- What’s the site’s main goal: generating B2B leads or strengthening the brand?
- What happens when someone clicks “Schedule a meeting”?
- Does the content need to be editable without touching the code?
- Do the footer links work in this delivery or are they out of scope?
- Who is the priority audience?
- Does it need Google Analytics?
I answered that it was a static branding site, with the button redirecting to an external scheduling tool, anchor navigation, footer links out of scope, no analytics and responsive. The PRD came out with an overview, goals, user stories, numbered requirements and the list of what will not be done:
### 2. Hero section

**Functional requirements:**
2.1. Show a credibility badge: "Brazil's #1 corporate mobility solution".
2.2. Show the main headline: "The home–work–home commute, more human."
2.4. Show two action buttons: "Schedule a meeting →" (primary) and "See solutions" (secondary).
2.5. Show an illustrative route widget ("Your route today") with pickup point and destination, simulating the app experience.
Numbered requirements aren’t bureaucracy: they’re what review and QA will check at the end. This PRD ended up with 28 of them, from 1.1 to 9.4, and the “Out of Scope” section made it clear what’s not included: internal pages, a logged-in area, CRM and analytics integrations, native scheduling.
Step 2: the Tech Spec (/create-techspec)
With the PRD approved, the next command turns requirements into technical decisions:
/create-techspec @tasks/prd-site-fretadao/prd.md
Before asking anything, the command tells the agent to explore the project, read the rules in .claude/rules and do research. For that it uses two external tools via MCP.
MCP (Model Context Protocol) is how you connect your AI tool to other systems: ClickUp, Google Drive, GitHub, a browser. Remember the tools from part 1? An MCP is a package of tools someone already wrote for you. Here we used two:
- Context7: fetches up-to-date documentation for libraries and frameworks, so the agent doesn’t decide based on an old React version it saw in training.
- Playwright: drives a real browser for end-to-end tests (we’ll use it in QA).
After researching, it came back with the technical questions: Next.js with static export, Astro, or Vite with React and TypeScript? Tailwind or CSS Modules? What level of testing? I picked Vite + React + TypeScript + Tailwind, unit and E2E tests, and icons from a library.
The Tech Spec came out with a summary of the approach, the component tree, interfaces, integration points, testing strategy and development sequence. An excerpt:
src/
  App.tsx                           ← pure composer: no logic, just composition
  components/
    layout/                         ← Header, Footer
    sections/                       ← HeroSection, SolutionsSection, CtaSection...
    ui/                             ← Button, Card, SectionLabel, RouteWidget
  theme/
    colors.ts                       ← brand color tokens
  constants/
    strings.ts                      ← all the copy in one place
Notice the theme/ folder and strings.ts. They came from a project rule (common/frontend.md) that forbids loose colors, fonts and copy in components. That’s why it pays to have Rules ready before you start: the Tech Spec is born following the team’s standards.
It also records the why behind each choice. Vite instead of Next.js because, for a static landing page, the SSR overhead isn’t worth it. The scheduling URL in an environment variable (VITE_BOOKING_URL), because the tool might change from Calendly to HubSpot without anyone touching the code.
Step 3: the tasks (/create-tasks)
/create-tasks @tasks/prd-site-fretadao
Two rules in this command make all the difference:
<critical>**BEFORE GENERATING ANY FILE, SHOW ME THE HIGH-LEVEL TASK LIST FOR APPROVAL**</critical>
<critical>EACH TASK MUST BE A FUNCTIONAL, INCREMENTAL DELIVERABLE</critical>
During the live talk, it suggested four tasks and I asked it to merge them into two, to fit the time slot. In the final version of the repository, the work ended up in three: 1.0 Project Foundation (theme, constants and base components), 2.0 Visual Implementation (the sections) and 3.0 Final Composition and E2E Tests.
Day to day, prefer more, smaller tasks. Each one is a point where you can stop, test, check it’s what you want and correct course. If something needs to change, the agent updates the PRD or the Tech Spec along with it, and the spec stays the source of truth.
The result is a tasks.md with the overall checklist and one file per task:
# Task 1.0: Project Foundation

<critical>Read the prd.md and techspec.md files in this folder; if you don't read them, your task will be invalidated</critical>

## Subtasks
- [ ] 1.1 Initialize the project: `npm create vite@latest fretadao-site -- --template react-ts` ...
- [ ] 1.2 Set up Tailwind v4 ...
- [ ] 1.4 Create `src/theme/colors.ts`, `typography.ts`, `spacing.ts` and `index.ts` with the brand tokens ...

## Success Criteria
## Task Tests
A cost tip: use the smartest model you have (in Claude Code, Opus) for the first three steps. They produce few output files, but that’s where the decisions are made, and a mistake there multiplies during implementation. To run the tasks, a cheaper model like Sonnet usually does the job, because the path is already fully drawn.
Step 4: run and review (/run-task)
/run-task @tasks/prd-site-fretadao/1_task.md
The command reads the PRD, the Tech Spec and the task, writes a summary and an approach plan and starts implementing. Three rules hold the quality up:
<critical>THE TASK CANNOT BE CONSIDERED COMPLETE UNTIL ALL TESTS ARE PASSING, **with 100% success**</critical>
<critical>You cannot finish the task without running the @task-reviewer review agent; if the review does not pass, you must fix the issues and run it again</critical>
<critical>After completing the task, mark it as complete in tasks.md</critical>
task-reviewer is a subagent: a file in .claude/agents/ with a mission and a set of instructions, nothing more complex than that. It identifies the task, looks at the git diff, checks the code against the rules and writes a 1_task_review.md. If it fails the review, the main agent fixes things and runs the review again.
And the checked box in tasks.md is the memory I mentioned at the beginning: in the next session, the agent knows exactly what’s already done.
Step 5: review, QA and bugfix
With the tasks done, three more commands close the loop:
/run-review: does a code review of the whole branch withgit diff, checks adherence to the rules, the Tech Spec and the tasks, runs the tests and produces a report with a status of approved, approved with caveats or rejected./run-qa: opens the app in a real browser through the Playwright MCP, tests each PRD requirement (those numbered RFs), checks accessibility (WCAG 2.2) and takes screenshots as evidence. Any bug found goes into abugs.md./run-bugfix: readsbugs.md, fixes each bug at the root cause and creates a regression test for each one, which would fail if the fix were reverted.
The final numbers, all recorded in the reports inside tasks/prd-site-fretadao/:
- The
task-reviewerreviews for tasks 1 and 2 came out approved with observations: nothing blocking, but with points to fix, like the font the Tech Spec asked for that hadn’t been loaded. - The final code review came out approved with caveats.
- QA checked all 28 PRD requirements: 28 met, with 48 E2E tests passing and no bugs found.
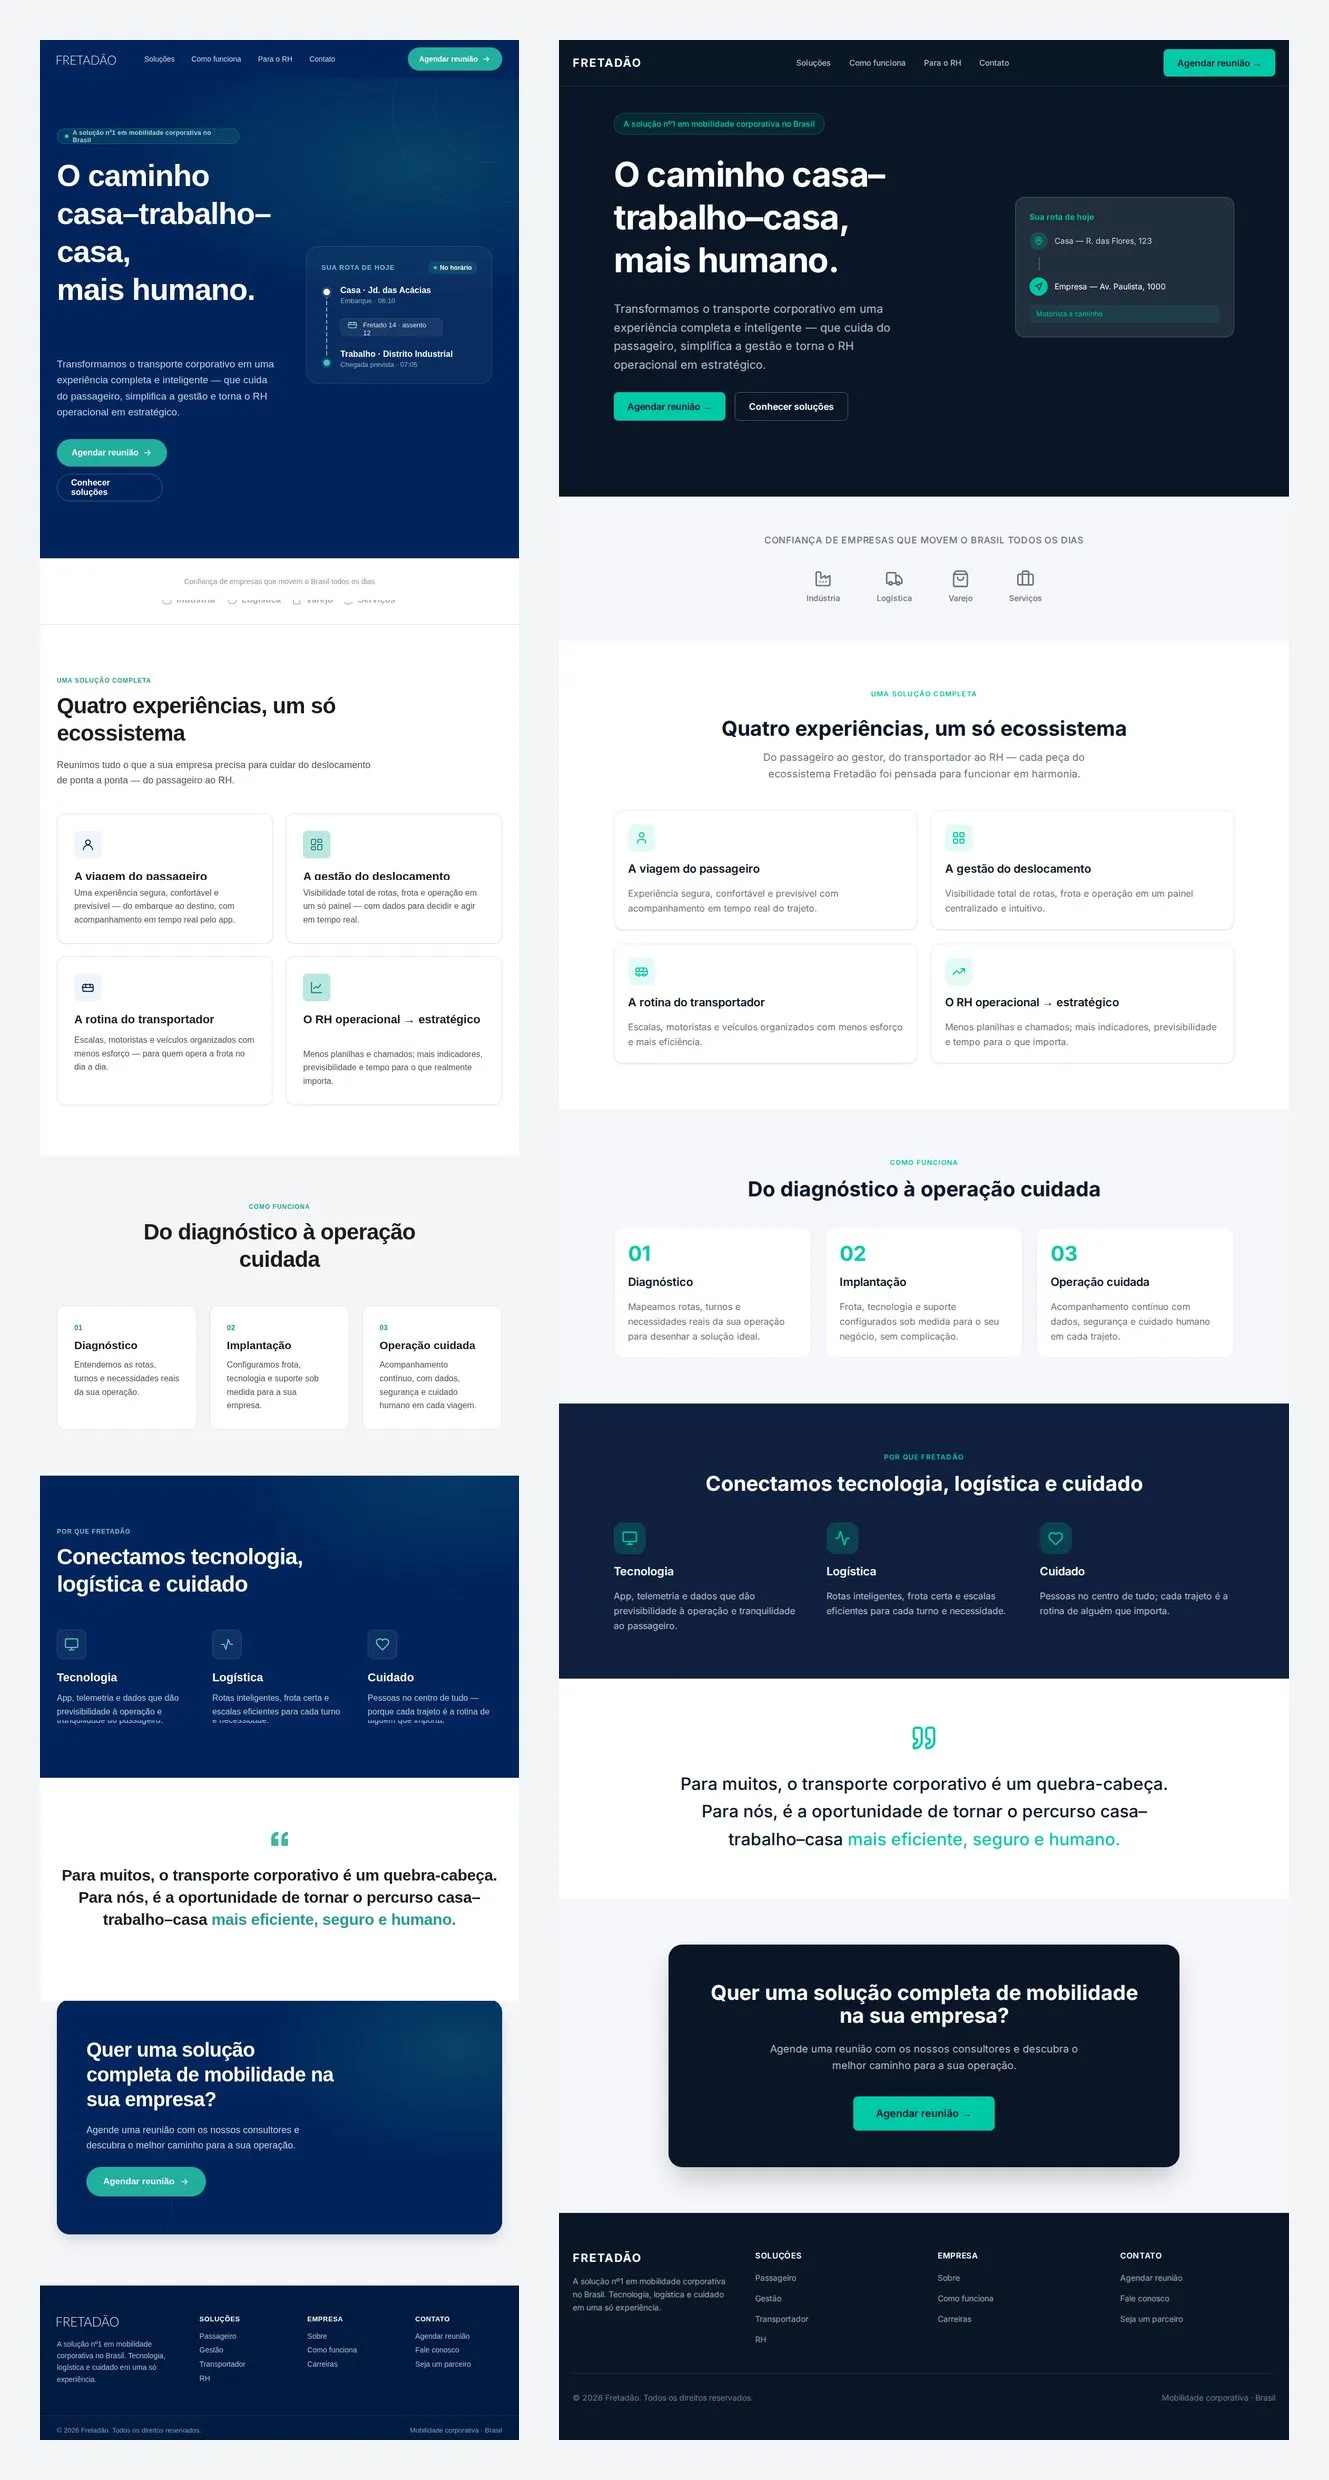
The result was a site faithful to the design, with the code organized the way the Tech Spec defined, tests passing and a report for each step. Most importantly: every decision can be audited, because it’s all written down. You can see the site live at fretadao-site.vercel.app.
On the left, the mockup that went into /create-prd. On the right, the site that came out of the workflow:
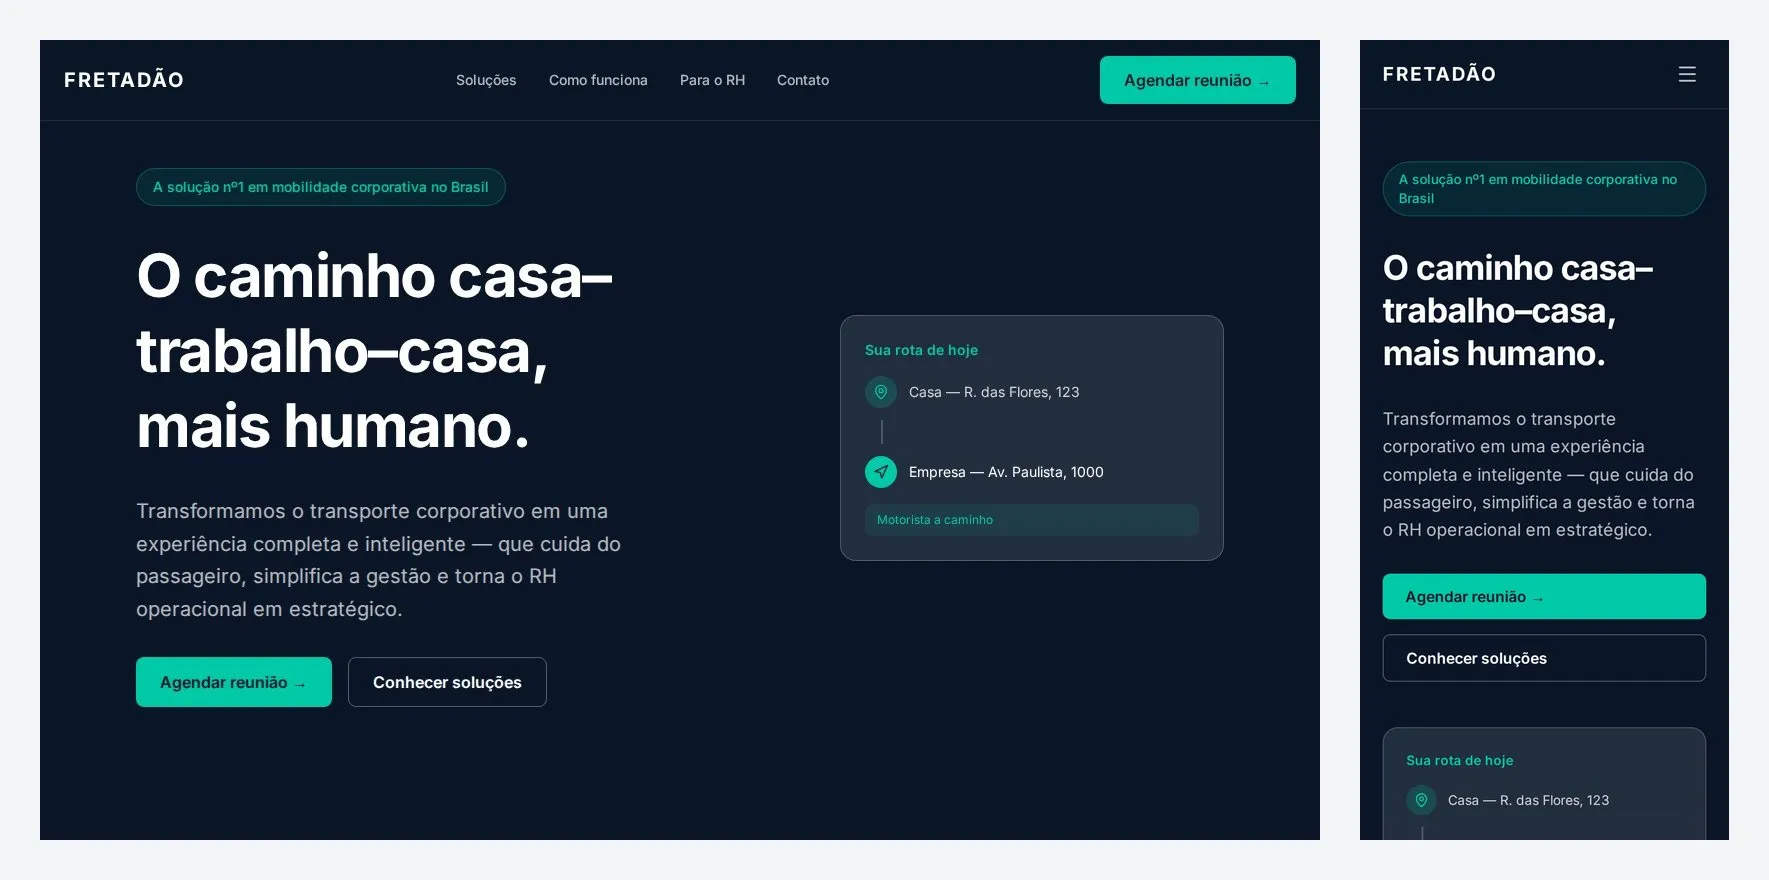
And the mobile version, which was one of the PRD’s requirements:
Bring it into your day to day
You don’t have to use these commands as they are. They’re a starting point: copy them, adapt them to your team’s templates and rules, and throw away what doesn’t make sense. Maybe you only want /run-review in your current workflow, and that’s fine.
One example that works well with MCP: connect the MCP for your project management tool (ClickUp, in my case) and ask the agent to create the PRD from the card. The description, comments and subtasks become context, and from there the flow is the same: Tech Spec, tasks, execution.
And this is just the foundation. On top of SDD people are already talking about Harness Engineering, which is taking care of all the tooling around the agent (rules, skills, commands, hooks, automated review on GitHub) so it produces code to the team’s standard without breaking production, and about loops, where the agent repeats the run, review and fix cycle on its own until the goal is met. Both depend on what we saw here: clear specs, so the agent knows when it’s done.
Conclusion
Spec-Driven Development is Context Engineering applied to a feature’s whole lifecycle. Instead of hoping one prompt carries everything, you build the context in layers:
- The PRD says what to build and why, and what’s left out
- The Tech Spec says how, following your rules
- The tasks split the work into small, testable deliveries
- Review, QA and bugfix check the result against what was specified
Each step produces a file, and each file becomes context for the next one. The spec becomes the source of truth, and the code becomes its consequence.
Next up: how to build a second brain with Claude Code and Obsidian, the knowledge base the agent looks things up in.